
Table of Contents
- Common Symptoms of Semi Truck Electrical Failure
- What You’ll Need: Semi Truck Electrical Troubleshooting Tools
- Step 1: Visual Inspection of Wiring and Connectors
- Step 2: How to Use a Multimeter on a Semi Truck
- Step 3: Battery Terminal and Ground Connection Maintenance
- Step 4: Perform a Heavy Duty Truck Parasitic Draw Test
- Step 5: Testing Your Charging System and Alternator
- Step 6: Check Fuses, Relays, and Circuit Protection
- Preventative Maintenance Schedules
- Frequently Asked Questions
Last Updated: August 31, 2026
Common Symptoms of Semi Truck Electrical Failure
Dashboard warning lights flicker or stay illuminated. The starter motor cranks slowly or won’t turn over. Lights dim unexpectedly while driving. These symptoms indicate problems with your truck’s 12-volt system or charging circuit.
The challenge is that electrical problems often mimic each other. A battery that won’t hold a charge might point to a bad alternator, parasitic draw, corroded terminals, a failing relay, or a hidden short circuit. Semi truck electrical systems follow predictable logic, once you know where to look and what to test, you can narrow down most issues in 30 minutes or less.
What You’ll Need: Semi Truck Electrical Troubleshooting Tools
A multimeter is non-negotiable. This single instrument measures voltage, resistance, and continuity. For semi truck work, you want a digital multimeter rated for automotive use with 0.1-volt increments and continuity testing mode.
A load tester applies controlled electrical load to your battery and measures response. For roadside diagnostics, a quality multimeter often suffices.
Jumper cables, a test light (12-volt lamp with alligator clips), wiring diagrams specific to your truck model, a flashlight or headlamp, a basic hand tool set (wrenches, screwdrivers, pliers), and a basic OBD-II scanner round out your diagnostic kit.
Keep a small diagnostic kit in your truck at all times. A multimeter, test light, jumper cables, and your truck’s wiring diagram fit in a small toolbox and have saved countless owner-operators from expensive tow bills.
Step 1: Visual Inspection of Wiring and Connectors
Before plugging in any tools, look at what’s visible. Many electrical failures are mechanical: loose connections, corroded terminals, damaged insulation, or a connector halfway unplugged.
Start at the battery. Examine both positive and negative terminals for white, blue, or green crusty buildup, terminal oxidation that creates high resistance and blocks power flow. Check that both battery cable connections are tight by grabbing each cable near the terminal and trying to wiggle it. A loose ground connection is particularly dangerous and causes intermittent failures.
Trace battery cables from the battery to the starter motor and frame (ground). Look for cracks, pinches, or bare wire. Follow the main wiring harness toward the engine bay and cab, looking for loose connectors at relay boxes and fuse panels. Check the alternator mounting and connections. Examine visible fuses and relays, fuses should sit flush in their holders, and relays should click when powered.
A visual inspection catches roughly 40% of electrical problems immediately (sae.org).
Step 2: How to Use a Multimeter on a Semi Truck
A multimeter measures three things: voltage (electrical potential), resistance (how hard current flows), and continuity (whether a circuit is complete or broken).
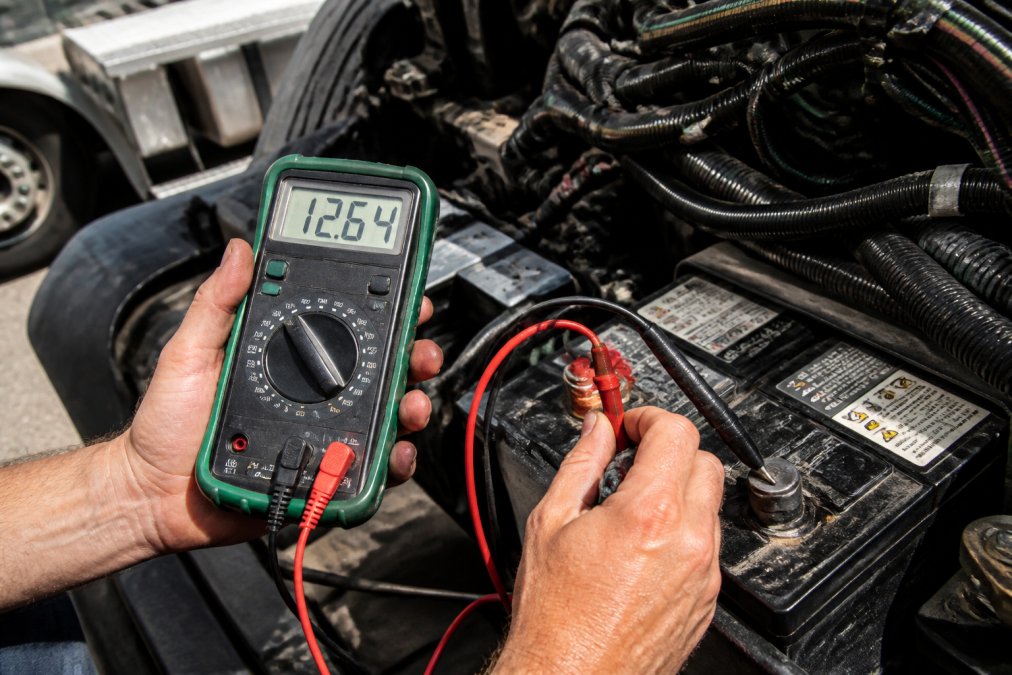
Setting up your multimeter:
Turn the dial to DC voltage setting and set it to a range covering your truck’s system, typically 0-20 volts. Insert the black probe into COM (common) and the red probe into V (voltage). Always connect black to ground and red to the test point.
Testing Voltage Output
Battery voltage should read 12.6 volts when the engine is off (faa.gov). Below 12 volts means partial discharge; below 11 volts is critically low.
Start the engine and retest. Voltage should jump to 13.5-14.5 volts. If it stays at 12.6 or drops below 12, your alternator isn’t charging.
Test voltage at the alternator’s output terminal with the engine running. It should read 13.5-14.5 volts. If the battery reads 13.5 but the alternator terminal reads only 12, you have high-resistance in the output cable or connection.
Test voltage at the starter motor. With the engine off, the large post should read 12.6 volts. Turn the key to start (don’t crank). Voltage should drop to 10-11 volts. If it drops to 8 volts or lower, you have excessive resistance in the starting circuit.
Continuity Testing and Open Circuits
Continuity testing tells you whether a circuit is complete (electricity flows) or broken (open circuit). Switch your multimeter to continuity or resistance (ohms) setting.
Disconnect the component you’re testing from power. Touch the red probe to one end of the wire and the black probe to the other. A complete circuit reads 0 ohms (or beeps). An open circuit reads infinity (or OL, “over limit”).
Test suspect wiring by probing both ends. An infinity reading means the wire is broken internally. Test relay coils this way, a relay reading infinity ohms in its coil is failed.
Test ground connections by probing from the component’s ground point to the battery’s negative terminal. You should get very low resistance (under 1 ohm). If it reads 5 ohms or higher, you have a high-resistance ground connection.
Voltage testing shows whether power is present. Continuity testing shows whether the path for that power is complete. Together, they isolate 80% of electrical failures.
Step 3: Battery Terminal and Ground Connection Maintenance
Battery terminals and ground connections are your electrical system’s foundation. A single corroded terminal can cause starting failures, charging problems, and intermittent gremlins.
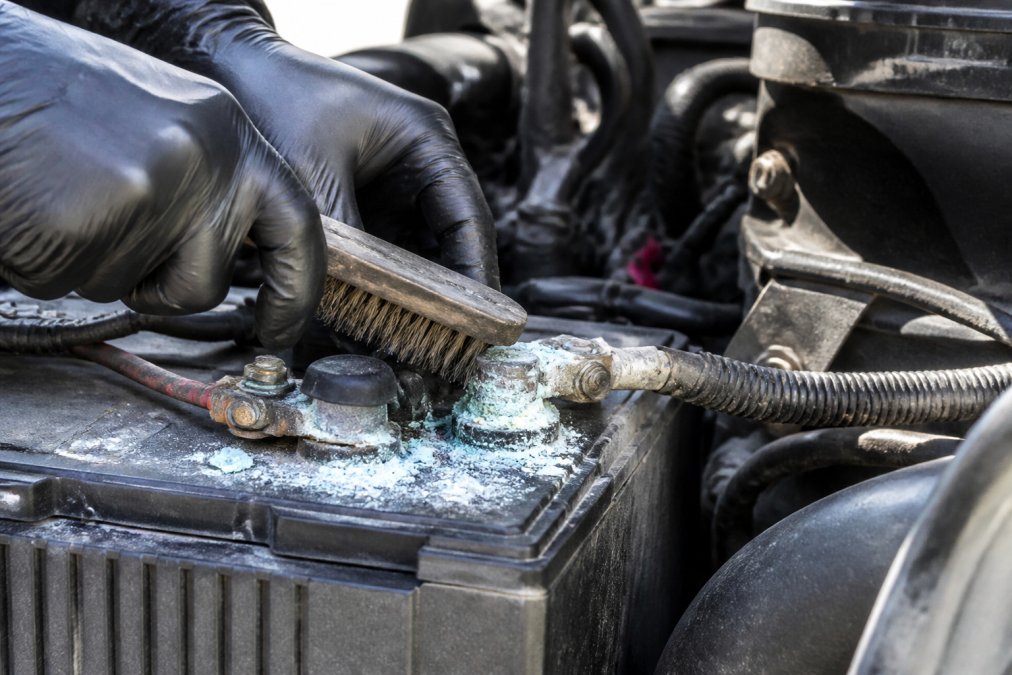
Identifying and cleaning terminal corrosion:
Corrosion appears as crusty buildup on battery posts and cable terminals. White or light blue deposits are typically lead sulfate. Green indicates copper corrosion. Black suggests oxidized lead. Even light corrosion creates electrical resistance.
Disconnect the negative cable first (always negative first to avoid sparks). Then disconnect the positive cable. Remove battery terminal clamps by loosening the bolt. Use a wire brush to scrub away corrosion. For heavy buildup, soak the terminal in baking soda and water first, then brush. Rinse with clean water and dry thoroughly. Reinstall clamps tightly so there’s no movement. Reconnect the positive cable first, then the negative.
Ground connections:
Your truck’s electrical system uses the engine block and frame as the return path for current. Inspect every ground connection you can see. Check that ground cables are tight and not corroded. Test ground resistance with your multimeter by probing from a component’s ground point to the battery’s negative terminal. Resistance should be nearly zero (under 0.5 ohms). If higher, you have a high-resistance ground needing cleaning or tightening.
Many electrical gremlins, dim lights, weak starter, intermittent fuel pump, are actually ground connection problems, not battery or alternator problems.
Step 4: Perform a Heavy Duty Truck Parasitic Draw Test
A parasitic draw is current flowing from your battery when the truck is off and all accessories are shut down. Excessive draw over 50 milliamps will drain your battery.
Performing the test:
Disconnect the negative battery cable. Set your multimeter to DC milliamp (mA) setting. Insert the meter between the negative battery terminal and the negative cable (the meter becomes part of the circuit).
With everything off, the meter should read very low, typically 10-30 milliamps. If it reads 50 mA or higher, you have a parasitic draw problem.
To isolate the source, pull fuses one at a time while watching the meter. When you pull a fuse and the draw drops significantly, that circuit is the culprit. Once identified, trace it to find the failed component (stuck relay, light that won’t turn off, shorted component).
CALL or TEXT NOW:712-827-0207 →
Never leave the multimeter connected to the battery for extended periods. The meter itself draws power, and you’ll get false readings. Perform the test, identify the problem, then disconnect the meter.
Step 5: Testing Your Charging System and Alternator
Your alternator charges the battery while the engine runs. If it fails, your battery will discharge and your truck will eventually stall.
Voltage output test:
Start the engine and let it idle. Probe the alternator’s output terminal with your multimeter set to DC voltage. With the engine running, voltage should read 13.5-14.5 volts. If it reads 12.6 volts (same as battery with engine off), the alternator isn’t charging. If it reads above 15 volts, the voltage regulator is failing.
Increase engine RPM to 1,500. Voltage should remain stable in the 13.5-14.5 range. If it climbs above 15 or drops below 13, the alternator or regulator is failing.
Load test:
Turn on the truck’s high beams and headlights while the engine is running. Voltage should remain above 13 volts. If it drops below 13, the alternator can’t supply enough current.
Checking the serpentine belt:
The alternator is driven by the serpentine belt. If the belt is slipping, the alternator won’t turn fast enough to charge properly. Check the belt for cracks, fraying, or glazing (shiny, slick surface). Test belt tension by pressing on the belt midway between pulleys. It should deflect about 1/2 inch under moderate thumb pressure. If loose, tighten it. If cracked or glazed, replace it.
Step 6: Check Fuses, Relays, and Circuit Protection
Fuses and relays protect your truck’s circuits from overload and control power distribution. A blown fuse or failed relay can kill power to an entire system.
Finding the fuse box:
Your truck has at least two fuse boxes: one under the hood and one inside the cab (usually under the dashboard on the driver’s side). Your wiring diagram shows their locations and identifies which fuse controls which circuit.
Identifying blown fuses:
A blown fuse has a broken filament inside the clear plastic body. Always replace a blown fuse with one of the same amperage rating. Using a higher-rated fuse defeats circuit protection and can cause fires.
Testing relays:
Relays are electromagnetic switches that control high-current circuits. A failed relay won’t click when powered, won’t pass current through its contacts, or gets stuck closed. Locate the relay in the fuse box and note its pin configuration. Apply 12 volts to the coil pins and listen for a click. No click means the relay is failed. If you suspect relay failure, swap it with an identical relay from a different circuit and retest. If the problem moves, you’ve confirmed the relay is bad.
Common circuit protection issues:
Intermittent electrical problems often trace to loose or corroded fuse contacts. Push each fuse firmly into its holder. Corrosion on fuse box contacts can prevent current flow. If you see green or white deposits inside the fuse box, clean them with a wire brush or contact cleaner. A fuse that blows repeatedly indicates a short circuit or component drawing excessive current, find and fix the underlying problem, as repeated fuse blowing is a fire hazard.
Keep a spare fuse of each amperage rating in your truck. A blown fuse is an easy roadside fix if you have the [replacement](/parts-inventory/).
Preventative Maintenance Schedules
Electrical problems are easier to prevent than diagnose. A simple maintenance routine catches issues before they leave you stranded.
Monthly checks:
Visually inspect battery terminals for corrosion and clean if needed. Check that battery cable connections are tight. Test your truck’s lights (headlights, brake lights, turn signals) to catch burned-out bulbs early.
Quarterly or every 10,000 miles:
Test battery voltage (should read 12.6 volts with engine off). Start the engine and verify charging voltage (should read 13.5-14.5 volts). Listen to the alternator for unusual noises. Inspect the serpentine belt for cracks or fraying. Check ground connections for corrosion or looseness.
Annually or every 50,000 miles:
Perform a parasitic draw test. Load-test your battery to confirm it delivers full current under starting load. Have the alternator professionally tested if unsure of its output. Inspect all visible wiring for damage, loose connections, or chafing.
Environmental factors:
Salt spray and moisture accelerate corrosion. If you operate in harsh conditions (coastal areas, winter salt roads, high-humidity regions), increase inspection frequency. Extreme heat can damage insulation and weaken connections. Extreme cold reduces battery capacity and makes starting harder.
Diagnosing semi truck electrical issues takes practice, but the fundamentals are straightforward: look for visible problems first, test voltage and continuity systematically, isolate problems by testing individual circuits, and maintain your battery and ground connections religiously. Most owner-operators can handle basic diagnostics themselves. When you need professional help, complex CAN bus diagnostics, computer module programming, or wiring harness repair, call in specialists like Mudhollow Diesel Mechanics. We bring advanced diagnostic software and heavy-duty tools directly to your location, whether you’re stranded on the highway or need preventive maintenance at your terminal.
For emergency roadside diagnostics and repairs across I-80 and I-29, contact Mudhollow Diesel Mechanics for rapid mobile service. If you suspect charging system failure or parasitic battery drain, professional load testing and alternator diagnostics can confirm the problem before it leaves you stranded. Call or text 712-827-0207 for immediate assistance.
Frequently Asked Questions
What are the most common electrical problems in semi trucks?
The most frequent issues include dead or weak batteries, alternator failures, corroded battery terminals and ground connections, parasitic draws draining the battery when the truck is off, blown fuses, faulty relays, wiring harness damage from heat or abrasion, and charging system failures. Intermittent electrical gremlins often stem from high resistance connections or loose connector pins. Environmental factors like extreme cold, salt exposure, and vibration accelerate these problems. Early detection through regular voltage drop testing and visual inspections prevents roadside failures.
How do you test for a parasitic draw on a heavy-duty battery?
A parasitic draw test measures current drain when the truck is off. Set your multimeter to DC amps and connect it in series between the negative battery terminal and the cable. A healthy truck draws less than 50 milliamps. Higher draws indicate a component staying powered when it shouldn’t. Disconnect circuits one at a time (fuses, relays, auxiliary systems) while monitoring the meter to isolate the problem. This test is essential for diagnosing mysterious battery drain that strands you between loads.
What tools do I need to diagnose semi truck electrical issues?
Essential tools include a digital multimeter (DC voltage, continuity, and amp capability), a load tester for battery and alternator assessment, jumper cables, a flashlight or headlamp, wire strippers, a test light, basic hand tools for connector access, and an electrical schematic for your truck model. Many owner-operators also carry diagnostic software or OBD readers for fault code retrieval. A clean workspace and safety equipment (gloves, eye protection) are critical. Professional mobile repair services bring fully equipped trucks with advanced computer diagnostics for complex CAN bus system issues you cannot resolve roadside.
When should I call for professional semi truck electrical diagnostics instead of troubleshooting myself?
Call immediately if you encounter fault codes requiring OBD software interpretation, suspect CAN bus system failures (modern truck control networks), need load testing beyond multimeter capability, or face intermittent electrical failures that are difficult to reproduce. If you lack a proper electrical schematic for your truck, or if your initial troubleshooting doesn’t isolate the problem within 30 minutes, professional diagnostics save time and prevent costly mistakes. Mobile repair services eliminate tow costs and get you back on the road faster than dealership appointments.
This article was written using GrandRanker